Impress your friends with this UNIX terminal setup
My UNIX terminal configuration has gradually evolved over the last couple of years, and I finally feel like I'm happy with the setup. In short, I use Tilda for my terminal, Zsh (with Oh My Zsh) as my shell and tmux as a multiplexer. This post explains why, and how, to set it all up, making you the envy of all your friends and colleagues.
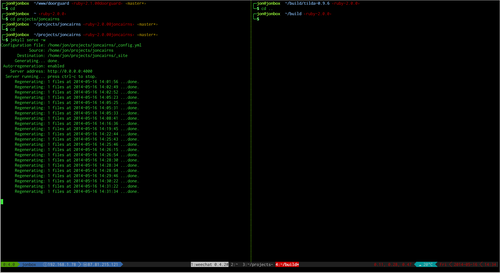
Here's the finished product:
Tilda
Why use it?
Tilda is a terminal that drops down on a keypress, like the old Quake style console. This is the main reason why I favour it over the default terminal that comes with Ubuntu, as it makes it far more accessible. You can configure the key-binding to make the terminal appear, along with various settings such as the animation speed, width, height and transparency.
It also takes focus immediately, making it very quick to access a terminal regardless of what else you might be doing at the time. It also handles tabs but, since I use tmux, I don't use them.
Installation and configuration
On linux systems that use aptitude, you can simply install it with apt-get install tilda. Other package managers will undoubtably have a version available, but it's best to make sure that you're getting version 0.9.6.
However, I now compile it from source, favoured over binaries. The reason is that I apply a patch to give a far richer colour palette, along with complete control of all the colours. This is a feature that's bizarrely missing from the official code, but it's easy enough to install tilda from source along with the patch.
First, install the following packages (for systems with aptitude):
apt-get install libconfuse-dev libvte-dev libglade2-dev flexNext, download and extract the source code:
curl -L http://sourceforge.net/projects/tilda/files/tilda/tilda-0.9.6/tilda-0.9.6.tar.gz/download | tar xvzAnd apply the patch:
cd tilda-0.9.6
curl -L http://sourceforge.net/p/tilda/patches/_discuss/thread/45eadc01/df46/attachment/tilda-0.9.6-palette.diff.gz | gunzip | patch -p0
Finally, do the old configure, make and make install:
./configure
make
sudo make install
This will then give you the command tilda, which you can run ironically in another terminal, or set to run at startup. On the first run, tilda will pop down as a small black rectangle; right click and choose "Preferences" to configure it. You can access the colour palette settings on the Colours tab.
Zsh
Why use it?
Most modern unix-based operating systems come with bash as the default shell, which is no bad thing by any means. However, Zsh is more customisable, more user-friendly and more forgiving when it comes to typos. For some of the other things it does well, check out this article.
oh-my-zsh is a separate project. In their words:
oh-my-zsh is an open source, community-driven framework for managing your Zsh configuration. It comes bundled with a ton of helpful functions, helpers, plugins, themes, and few things that make you shout...
"OH MY ZSHELL!"
oh-my-zsh comes with a large number of themes for styling the prompt, which can provide information such as the current git branch and uncommitted changes, system load, exit status of the previous command, current ruby version and gemset managed by RVM, and more. Having some of these simple things can help you cut down on the number of commands you would otherwise be typing repeatedly.
Installation and configuration
First, you'll need to install Zsh. If you have access to aptitude, it's a simple case of running apt-get install zsh. Otherwise, get it from whichever package manager you use. Next, install oh-my-zsh with:
curl -L http://install.ohmyz.sh | shThis will create a .zshrc file in your home directory (it will back up any existing zshrc), and will clone the oh-my-zsh project into .oh-my-zsh/. You will also need to change your user's default shell to use Zsh:
chsh -s `which zsh`You're now ready to start customising your .zshrc file. At the top, there's a ZSH_THEME environment variable, which is the name of the theme to customize the appearance of the prompt. Take a look at the avaliable themes and put the name of the one you want into that variable. My choice is bira, which you can see in action in the screenshot at the start of this post.
Read the README for more information on customising Zsh, and adding plugins.
Tmux
Why use it?
Tmux is a terminal multiplexer, which allows you to do easy split-screen terminal views, detach processes, have multiple windows and even allow others to attach to your current terminal session. It's fantastic for pair programming in this respect, so I use it all the time in the office just in case I want a colleague to SSH in and join me.
It also has a status line at the bottom, which you can customise to show useful information. Take a look at the screenshot at the start of the post to see mine - it shows things like my local and external IP addresses, system load and the weather outside (no kidding).
Installation and configuration
Aptitude makes things so easy: apt-get install tmux. I'm sure it will be available in most package managers, but if all else fails you can check the home page for installation instructions.
After installing, you start tmux by running the command tmux. However, you'll want to configure it first, which is a pretty in-depth process. Create a file at $HOME/.tmux.conf, and read about how to configure tmux. Or you could just copy my configuration. If you want the pretty status line at the bottom of the screen, you'll need to download tmux powerline and get a patched font.
If you use your own configuration, note that you might need to add this line to use zsh as your default shell within tmux: set-option -g default-shell /bin/zsh.
With tmux running in one terminal, you can attach to the same session in another terminal by running tmux attach. This allows basic remote pairing, but for more advanced control (such as read-only or completely independent usage) give wemux a go.
And that concludes my setup. Enjoy!


